W.I.P. Wednesday : Basic Unlined Felt Stocking

The big count-down is on, kids, and if you’re like me, you’ve still got gifts to make and cookies to bake.  I was working on this relatively easy, unlined felt stocking today and thought I’d share this idea with you.  Depending on how fast you embroider and sew, this can be a very quick project.

These were for Guppy’s teachers this year.  I didn’t think to take a picture until we were leaving for school, hence the horrible lighting in the pre-dawn hours of 8:30am!  You can hardly make them out, but there are snow flakes above the trees…

You’ll need :

  • Vegan felt.  I used the vegan felt made from recycled plastic bottles I’ve blogged about before.
  • Embroidery Floss & Needle
  • Pencil or something to trace your pattern on.
  • Christmas stocking to use as a model (if you don’t have a stocking at home, just free-hand it or google it, there are lots of them out there).
  • Scissors, thread and optional sewing machine (you can hand sew this quickly).

1) Start by tracing your stocking shape onto your felt.  The quickest way to do it is to line up your two pieces of felt back to back, or fold a larger piece in two, then pin together.  That way you’ll only be cutting once.

2) Once you’ve cut out your felt, you’ll want to draw a little something on it to embroider.  If you’re in a hurry (it is 3 days to Christmas) try to make your design rather simple.  I just free-hand using a fat pencil.  If this scares you (it did me the first time) practice a few times on a piece of paper first.

I just free-handed this little elf girl, see the minimalist lines, etc. She’s not done, yet – I still need to give her a smile!  Snowmen, Christmas trees, etc. work well here as they require few details yet still look lovely.

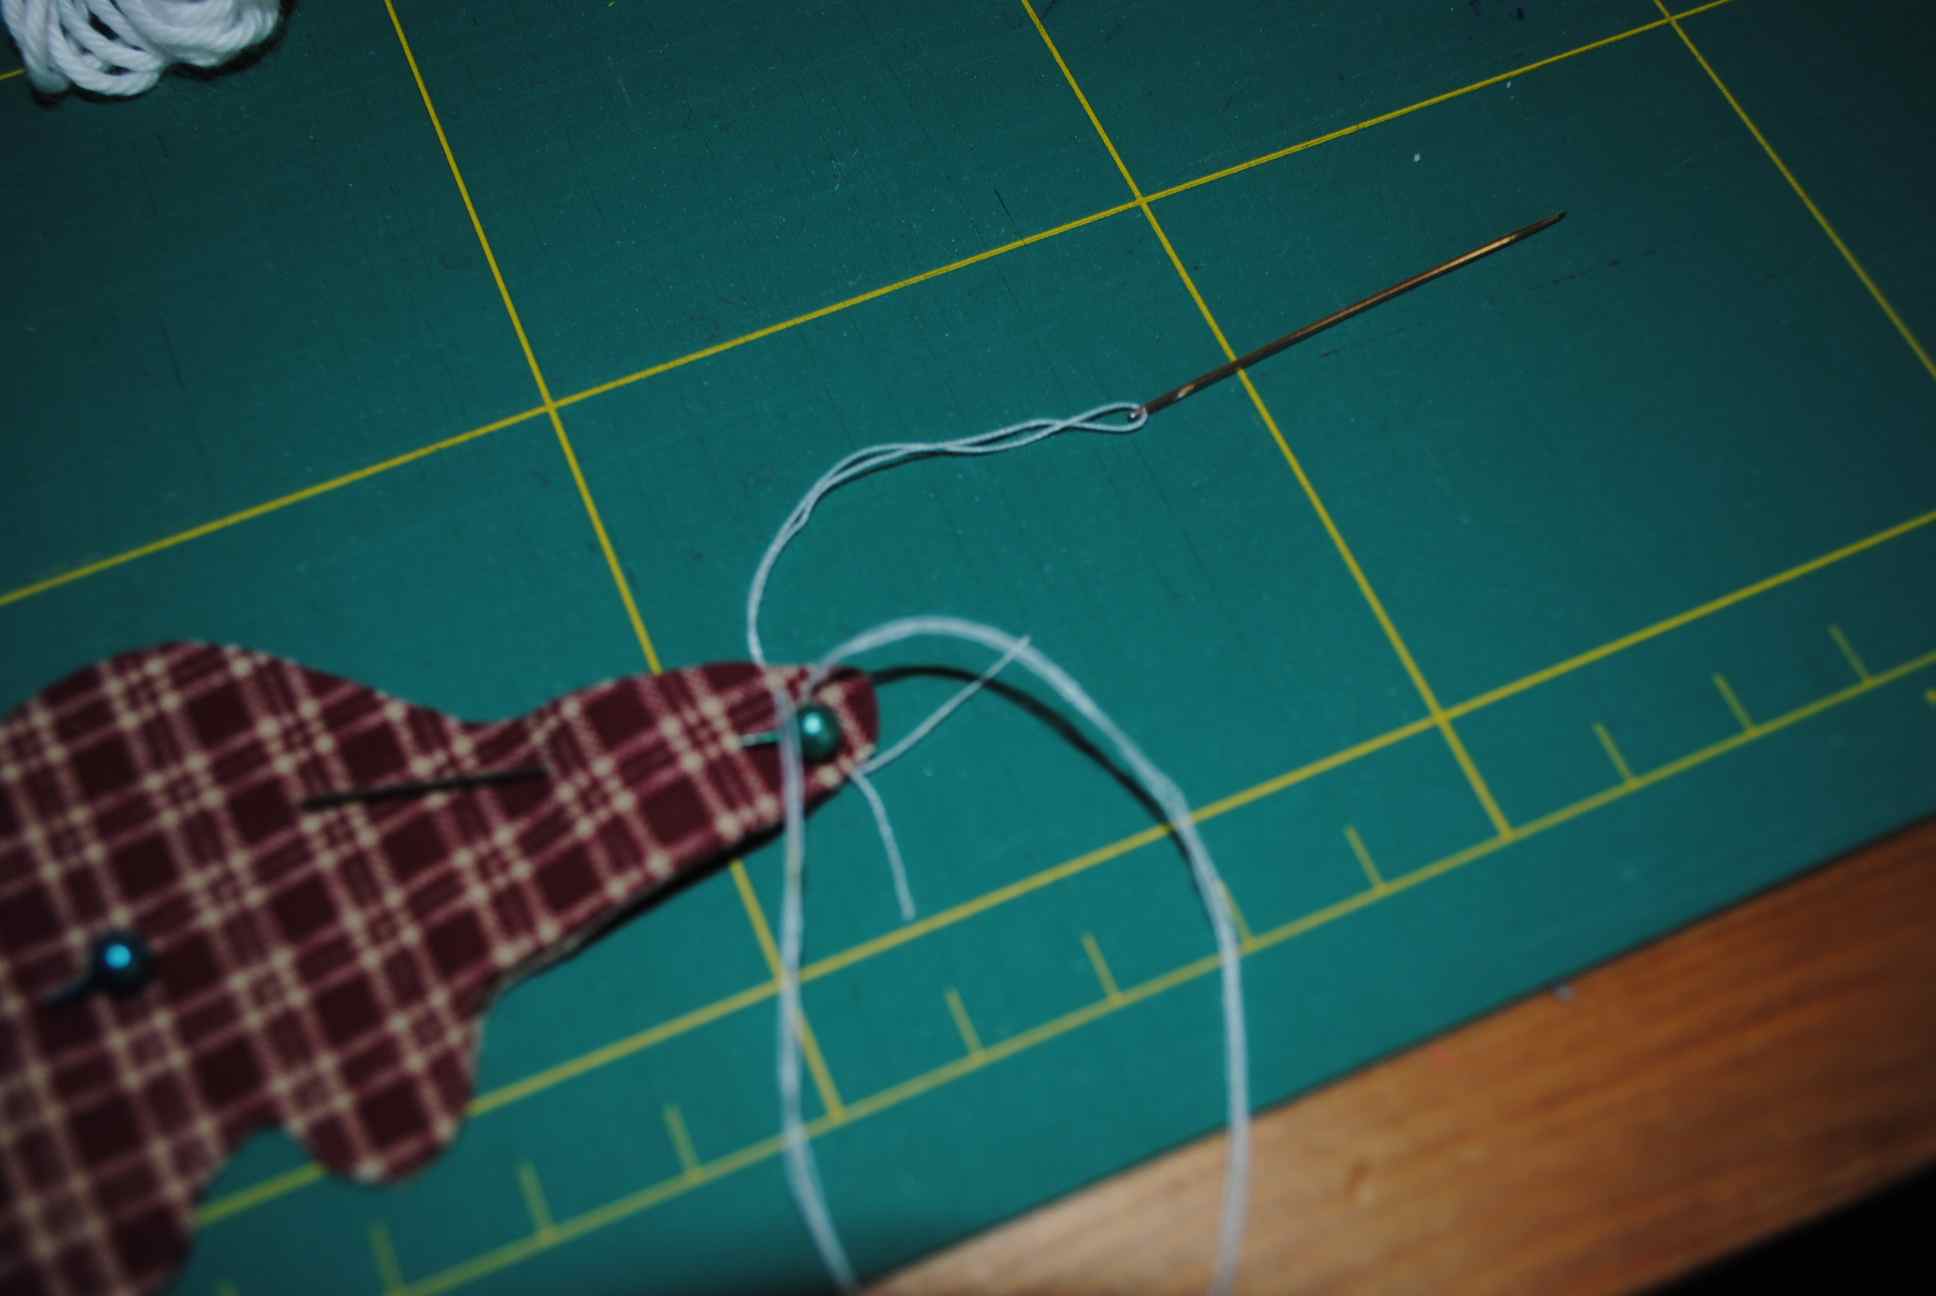
3) Embroider!  Some people prefer sewing first, then doing the embroidery, but I find that because there isn’t much room to move inside the stocking it’s easier to embroider first, then sew. Look at the “How To” section at the top of the page for tutorials on basic embroidery, or again, google it.  There are many helpful videos on YouTube, too.  I just used a basic split-stitch for most of this little elf, but do what is easiest for you.

4) If the idea of embroidery scares you, just add a few appliqués.  Follow the technique for the Basic Holiday Ornaments to get fun shapes, then handsew them onto your stocking – just be sure to allow for a seam allowance, or your adorable shapes will be swallowed by the seams! Aaak!

5) Fold over the opening of your two halves to finish them off and give them a nice, finished seam.  The best is to fold over once, then fold over again so the raw edge is tucked up nicely.  The amount is up to you, just be sure it’s not too bulky and that it’s the same on both halves.  Sew them up with your machine (faster) or by hand (not terribly slow, if you’re only making one stocking).

6) Now it’s time to sew the two halves of your stocking together.  Pin them right sides together, like so :

Now just sew along the edge, giving yourself about a 1/4 inch seam allowance, and turn inside out! You might also want to add a little bit of ribbon to the top for hanging, or embellish with ribbons, etc.

I don’t actually have a finished picture of this one as I should be sewing it rather than writing a blog post about it, but to see a finished one, just again refer to the first photo in this post!  Hopefully this one will be sewn up and stuffed with goodies before next year…

Do you have any ideas for quick, last-minute gift ideas?  Just remember, it’s ok.  No matter what you’ve made or who you’ve made it for, it really is the thought that counts, no matter how trite that sounds.

W.I.P. Wednesday will be back next year!  It’s going to be an exciting year, and there will much going on.  I can’t wait!

Sewing Basic Holiday Ornaments Step By Step : W.I.P. Wednesday

Last week I blogged about the famous “Cookie Cutter” ornaments I make every holiday season, and about how quick and easy they are to make.  Then, after an email and a few comments it dawned on me that easy is a rather subjective word.  For someone who has never tried to thread a needle or tried to sew (gasp!) for fun, well, not so much.

If you’ve got sewing experience then this post will probably bore you, but if you’ve got pointers or URLs with other more basic holiday projects to share in the comments section, please do.

So let’s sew up an ornament together!  It’ll be fun, promise.  You’ll need a few basic things to get started, things you may already have around the house!

What you’ll need :

  • Cookie cutters or other shapes you can trace as patterns, unless you’re going to free-hand your drawing, which is also fun, especially if working with little kids who love seeing their drawings “come to life”.
  • Sharp scissors
  • Thread – So many choices!  Cotton thread, or thicker, more durable craft thread, embroidery thread (you’ll want to use about 2 or 3 strands) or even some thin cotton yarn.  I have also used very thin satin ribbon which is pretty, too.
  • Fabric – Before you run out to buy some, or think you can’t give the project a go because you haven’t any, just stop.  You can use nearly anything!  A re-purposed dish towel, the sleeve of a torn cotton shirt, bits from a stained table cloth, etc.  You can also use heavier craft paper – it looks lovely sewn.
  • A needle for sewing and some pins to hold your fabric together.  In a pinch you can use tape to keep the pieces together, and even paper clips.

Get your fabric and fold it in half, with the right sides together.  This just means that the side of the fabric you’d like to see once your decoration is done faces the inside for now.

See what I mean?  The red-checks are facing in and the boring backing is facing out.  Perfect for drawing or tracing on.  Because we make a few new decorations every year, they are like little snap-shots of the past.  We love dinos, so we make a few each year.  If your child (or husband) likes super heroes, try a cape with an S on it, or maybe an outline of a car.  Don’t worry about it not being traditional!  I still need to make a zombie for Monsieur Fish, because that’s what he loves, but haven’t got it worked out yet.

Once you’ve traced, pin the fabric together and cut it out, going through both layers of cloth.

Now put the wrong sides together, right sides facing out, and pin to secure.  Ready to sew?  First, let’s look at your needles…

Notice how the top needle has a rather large eye and a blunt end?  That’s an embroidery needle, so it can handle thicker threads, embroidery thread, yarn and ribbon.  The tinner, sharper needle will work with cotton or nylon thread. Let’s thread your needle!

You want to have a workable length of thread, not too long or it’ll get tangled up, too short, and you’ll be re-threading often.  About from your hand to your elbow is a good size I think.  If you’re using regular cotton thread, just feed one end through the eye of the needle, then bring it to meet the other end so you’ve got a double-layer of thread (more sturdy).  If using embroidery thread, take two or three strands, feed one end through the needle and pull to about half-way the total length, then knot the long end.  It’s already sturdy enough so you don’t need to double up.

For your first stitch, you’ll begin going from the inside of your “sandwich” of fabric from the wrong side of one piece to its right side (meaning outside the dino here).  Gently pull until the knot is against the fabric, and tuck in or carefully trim any little tails that are left.  We’re going to do a straight stitch here, but to make things even easier, think of it as an in and out stitch. You just bring the needle through from one side to the other, all the way around your shape.  Stop a bit before getting all the way around to stuff it if you’d like.  You can use scrap yarn and thread, or cotton or nylon batting. Then sew up the hole and tie a knot to secure.

I hope this is helpful, and inspires you to make a few ornaments for your tree or window or potted plant or whatever.  The tutorial for the Felt Doughnuts may also be helpful for you, too.  They also make cute decorations for you tree, Jeni Treehugger says so herself!

Here are a few flashed-out examples of other shapes to try…


W.I.P. Wednesday on Thursday & We have our winners!

The lack of light has been reeking havoc on my photos, and I know many of you can relate.  I had a great post prepared for making holiday ornaments and decorations, but didn’t get to shoot it properly, so that’ll be for next week, and hopefully on Wednesday.  Whatevers.

I’ve blogged about these ridiculously easy felt ornaments before.  You just use your favourite cookie cutter (or anything) and use it to trace your desired shape onto your chosen fabric and sew it up.  Tah-da!

But you don’t so much care about that – you want the winners!  I’m not offended and totally understand.

The winner for the chocolate bar post was number 5, and for the tea it was 20.  You’ll just have to believe me folks, I still don’t know how to take a still of the random number thingy.

Jojo of Vegan In Brighton will be sent some a dark chocolate with quinoa (so good!) and Fanny from Vegan Up North is getting some tea.  Which kind? I’ll decide!  Ladies, would you be so kind as to email me at fishbowlmusings (at) gmail (dot) com and I’ll get your goodies off to you soon.


W.I.P. Wednesday : Randoms

wipbanner_red1

Happy Wednesday, kids! I want to sincerely thank all of you for your comments on my article over at The Daring Kitchen. You’re all too cool for school, and that’s the truth. So there. Now, onto W.I.P. Wednesdayness!

I was able to get a little work done on this month’s Stitch-Along. I think these are the perfect size for my 6 month-old niece’s hands to hold, so I’ll be sending them off to her for Easter (meaning, I’d better get rocking on them if they are going to be finished and sent in time).

bunny
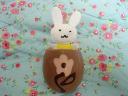
In-progress Bunny. Note the terribly sloppy outline. I did get a “D” in neatness in the First Grade. Scarred for life, I tell ya.

little-bearFinished little Bear

If all goes well, I’m going to put some tinkley-bells in one, and hopefully some crinkly-sounding plastic in the other for some added fun. I’ll keep you posted.

I’m also trying to finish up some cupcakes for more notebooks like these. I’ve still got a few notebooks left, but I’ve got the materials together to make my own and I’m really excited about it! I’ll have camera in hand to get you a proper tute when the moment arrives. For now, here’s the in-progress cuppers :

embroidered-cupcakes

Did you notice those gorgeous French knots/sprinkles? I’m going French Knot crazy, and not just because I’m a Francophile. Honestly, I couldn’t figure them out until very recently (ie: bane of my embroidery existence). I started to think it was a seriously lost cause, but then I checked out Jenny Hart’s tutorial and it changed my life. Well, it changed my embroidery. Thing is, I’m not sure if I like the French Knot sprinkles, or the longer seed stitch ones I did before. Thoughts?

Before the holidays I promised a tutorial to show you how to make a pair of child’s pants sans pattern. Ture to my word, I had the opportunity to take some photos while making these :

snazzy-pants-for-guppy

Sorry for the wonky color-scheme here – these are orange and white striped pants for Guppy, who seemingly overnight grew 3 centimeters (yet to be confirmed with our highly-scientific measuring in-the-doorway method later today) and is in major need of longer pants (or higher socks). I’d started working on her dress, but have put that aside for the more serious and practical business of pants. Please forgive my slapdash sticking pants on wall with a piece of painter’s tape mise en scène here (would have been more professional to actually get the legs and stripes to line up before I snapped the shot, hey?).

This is the most lovely fabric, which is a sailcloth-ish cotton twill (I’m not fluent in fabric yet, sorry) that I bought nearly a year ago at Ikea never dreaming I’d have the skillz to make pants! Had I known I would have bought more because I would love to have a pair of loungy pants like these – they look like acrobat pants and orange popcicles all at once. To me, anyway. I ended up having to slim the legs a little bit on these because Guppy wasn’t into the baggy look, but that wasn’t too difficult to pull off. If I can get over this sludge which had me bed-ridden all weekend (and up until today) and get all productive-organized-crawl out from under my pile of backlogged behindness, I’ll get the tutorial for next Wednesday. Maybe. I hope.

Have a crafty week, and don’t forget to see what the other Wipsters are up to, and to check out our W.I.P. Wednesday Flickr Pool, too.

W.I.P. Wednesday : The finished, the planned and the in-progress…

wipbanner_blue6

This is an extra-large serving of W.I.P.ness, so grab a little cup of tea and here we go!

The finished : Staring here is good, helps me to feel like I’ve accomplished something!

zen-carp

Here are the carp I told you about here. Love them. I hope my nephew does, too.

notebook-with-art-bag

He’s quite a sketcher (I sent him the watercolour-pencil roll for Christmas) so I thought a blank notebook would suit him. I also made him a black denim pouch to slip the notebook and some pencils in, in case he wants to do a little field work (ok, this is a bad inside joke because he lives on a farm. Sorry.)

It’s also my niece’s birthday soon, so here are her goodies :

wee-wonderfuls-butterflies

The little dude’s antenna/hat isn’t sewn on yet in this photo, but I assure you, it has since been sewn on and they are on their way to the U.S. along with this :

felt-flannel-pouch-felt-heart-pin

…a little felty pouch (decorated with ribbon on the other side) and a heart pin because they are so cute I’m making them for everyone! I used this felt, and for the butterflies I used this adorable pattern from Hillary Lang of Wee Wonderfuls fame. I just noticed she’s having a doll giveaway today – go throw your name in the virtual hat!.

butterfly-pattern

This was one of the first patterns I ever ordered (about 9 months ago), but this is the first time I’ve used it. I have a feeling I’ll be making more of these in the future they are so sweet. And springy.

Oh, and a new pincushion, because I just love making these little cuties!

beige-cordory-lavender-cotton-pincushion

and the other side, so you can see my wonky stitching.

lavender-beige-pincushion-other-side

Now, the in-progress :

unfinished-doll

Another one of these dolls. This is for a “new” baby (she’s already 3 weeks old – aak!). She’s mostly done – just need to sew her hair ribbon on and get her limbs attached. Have you ever noticed the less you have to do to finish a project, the more difficult it is psychologically to get it done? Or is it just me?

I started this last night for the talented Tacha :

bunny-under-construction1

Lucky me gets to test another pattern for her! This is going to be adorable – I’ll hopefully have it ready for show & tell by Friday! She has the best stuff in her shop – go check it out!

The planned :

Unless you’ve been living under a rock, you’ve surely heard of the terrible fires in Australia, killing so many – humans and animals – and destroying everything in sight. I wanted to so something, so I donated what I could, but still felt like I wasn’t doing anything. Then, the aforementioned Tacha told me about The Bushfire Quilt Project. Tia Curtis, an American quilter living in Australia, is rounding-up quilt blocks from all over the globe and with the help of local quilters, they are creating quilts for families who lost everything in this tragedy. If your life has ever been touched by fire, you know the devastation of completely starting over. These quilts may not be much, but they are a start, and a great way to show some global solidarity to our Australian friends.

That’s great, Shellyfish, but I don’t know how to quilt. Well, guess what? Neither do I! But I’m committing to making at least a few of these Wonky Stars thanks to the tutorial. My biggest obstacle is an anemic fabric stash, but I’m hoping to get some scraps organized Friday. Here’s The Bushfire Quilt Project Flickr Group if you want to be inspired. Doing what you can makes such a big difference, be it 2 or 50 squares. Others are sending quilting supplies to help out. Just wanted to spread the word, and thanks to Tacha for sharing the links with me!

And to finish, behold! Guppy’s new dress, er, dress fabric :

orange-cream-fabric

Ok, this fabric is just dreamy. It has such a great feel and weight to it. Yum. We don’t have a fabric store in town, but there is a vendor who comes to the marché twice a week. The up-side is he often has designer remnants at great prices. The down-side is that you can’t buy the amount you’d like – you’re stuck with whatever size the remnant is – be it a half meter or 3 meters. It’s a good thing in this case because I got nearly 3 meters for 10E which is just super exciting!

I wish I were only 4 and could have a dress, too. Ok, no, when I was 4 I wouldn’t be caught dead in a dress. But Guppy is rather excited about it, probably because she doesn’t have any cold-weather dresses so it seems special. I’m excited because I’ve never made a dress before. So much excitement.

Speaking of excitement, next week’s W.I.P. will have our Wipster of the Month interview and we’ll also have our March Stitch-Along – I bet you just can’t wait! Try to satisfy your curiosity by visitng the other Wipsters to see what they are up to this week, and don’t forget the W.I.P. Wednesday Flickr Group, too!

wipwed_pinkred2401

The Bunny!

I woke up and wanted to hurry to get out for my run, when I heard squeals of joy emanating from the living room…

the-egg.jpg oeuf.jpg

The Guppy knew that today was “Bunny Day”, and she was up and in the living room standing before her basket, repeating excitedly, “Mumma, Mumma, look!”

rouge.jpg jaune.jpg

rose.jpg tada.jpg

How exciting! Baby felt bunnies hatching from vegan chocolate eggs!

lapetitefamille.jpg

Madame & Monsieur Lapin (Monsieur is easily recognizable by his little French moustache and pink attire…because male-folk do wear pink!) were my first attempts at sewing with a machine (more on that another day…). I followed the free Wee Bunny pattern from Wee Wonderfuls. Monsieur Rabbit was my first attempt (er, pas terrible or not-so-great as we say in French), but Madame Rabbit is much cooler (and looks darn good for just having a brood of felt bunnies!). The little felt bunnies are from the cutest book in the world which I want to blog about when I get the time so I won’t steal the thunder from a future post.

The Bdefilles.jpgunny of Spring didn’t forget me, as I found this beautiful book in my basket and cannot wait to start a billion projects…