Unleash your sweet-tooth for this month’s Daring Bakers Challenge Cheesecake Pops from Sticky, Chewy, Messy, Gooey: Desserts For The Serious Sweet Tooth by Jill O’Connor. I’m warning you now, this is not in any way a healthy-avid-yoga-runner-wholefoods-type recipe…but it was indeed very tasty, sticky, messy & gooey to make (which always hightens the fun-factor if you ask me).
This month’s lovely challenge hosts Elle from Feeding My Enthusasims and Deborah from Taste and Tell found we Daring Bakers a very decadent treat indeed (thank you for your time & effort, ladies!) Cheesecake is in itself quite an indulgence, but for this recipe it’s only the beginning! After you’ve baked your cheesecake you then freeze & form it into various shapes and give them lollipop sticks, then coat in chocolate and decorate! Wow! Holy calories, Batgirl! That being said, because they are individually sized, you can easily control your portions, so that’s a good thing. I guess. If you’re into that sort of thing…controlling cheesecake consumption I mean…
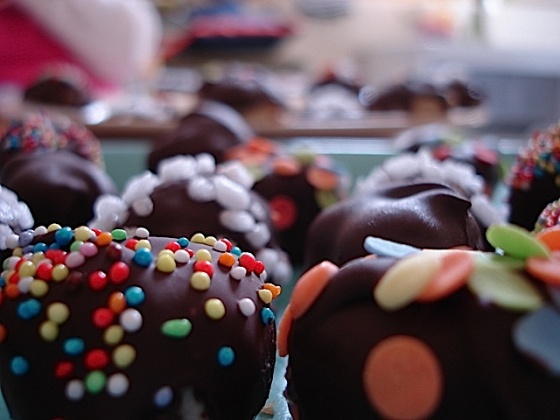
My favorite parts of this challenge were 1) completing the challenge with my super-cute mum who though battling a nasty nasty bout of illness played along and was available for planning consultations, official tasting & artistic direction (decorating) duty; and 2) the actual making of the tofu cheesecakes. I thought it was a blast! I totally admit to a heavy dose of finger-licking as well…see, these were indeed intended to be “pops”, but despite my best intentions (I visited two gourmet cooking shoppes & two super markets) I could not find anything that would work- I found popcicle sticks (too fat), super-thin straws (too flimsy), long, wooden sticks for cotton candy (too thick & long)… so I decided to turn this temporary set-back into a fun chance to use some new silicon molds that my mum brought me from the states! As a Daring Baker I was to follow certain guidelines, but using molds was ok’d by our hosts, so yeah for the molds! There were heart-shapes, disc-shapes, and flower-shapes, too!
Thing is, because there were no sticks to hold, I was hand-dipping them, which was a blast! Felt like a kid in the kitching doing something I could be scolded for! Another fun aspect of this month’s challenge was that a handful of the Daring Bakers Alternative Bakers got together to “chat” to exchange ideas & recipes & ideas, and that was a great chance to “meet” some new bakers & hear some ideas. 
Here’s the recipe that I used (based on the tofu cheesecake recipe from The New Farm Cookbook (the original non-vegan Challenge recipe is at the bottom of this post if you want a peek!)
- 3 1/2 cups firm tofu (rinse it, but don’t drain)
- 1/2 cup lemon juice (I’ve used orange for orange cheese cake & it’s also good)
- 1/2 cup oil
- 1 cup sugar
- 1-2 table spoons vanilla or almond extract (or one of both if you’re really feeling crazy)
and for the chocolate coating:
- 300g dark chocolate
- 2 tablespoons non-hydrogenated vegan butter
I wiz everything in the blender or food processor till smooth (adding a little more juice if it’s a bit too stiff, normally it’s very smooth). If you were making a normal cheesecake, you just pour it into the crust & put it in the oven for about 50 minutes at 170c/335F. Because I opted for silicon molds this changed my normal baking time dramatically because the molds were of different shape & depth & made by different companies so the individual baking times varied from mold to mold (the shortest being 25mins, the longest 45). What I did then was to leave them in the moulds while they cooled (which I totally admit made my life easier than trying to scoop them out of a pan and shape them).
 For the chocolate coating, I melted half the chocolate and 1 tbsp of vegan butter in the microwave and stirred well (so much work there). Then, carefully not burning my fingers on the chocolate I swirled the shapes in the chocolate. I found that even after being very cool from the fridge they were still really difficult to coat so I put them in the freezer & found that the colder they were, the easier they were to coat (less cold = thicker, goopier chocolate coating, whereas colder = pretty, thin layer). I also found that I had to sprinkle the decorations on right away after coating them or the chocolate hardened and they wouldn’t stick.
I’ll be honest- while the cheese cake was delicious, having it coated in chocolate just seemed too much for my family who seemed to just peel it off. It was, however, a very fun challenge, and I can’t wait to see what’s next!
Here’s the original recipe from Ms. O’Connor’s book:
Cheesecake Pops
Makes 30 – 40 Pops
5 8-oz. packages cream cheese at room temperature
2 cups sugar
¼ cup all-purpose flour
¼ teaspoon salt
5 large eggs
2 egg yolks
2 teaspoons pure vanilla extract
¼ cup heavy cream
Boiling water as needed
Thirty to forty 8-inch lollipop sticks
1 pound chocolate, finely chopped – you can use all one kind or half and half of dark, milk, or white (Alternately, you can use 1 pound of flavored coatings, also known as summer coating, confectionary coating or wafer chocolate – candy supply stores carry colors, as well as the three kinds of chocolate.)
2 tablespoons vegetable shortening
(Note: White chocolate is harder to use this way, but not impossible)
Assorted decorations such as chopped nuts, colored jimmies, crushed peppermints, mini chocolate chips, sanding sugars, dragees) – Optional
Position oven rack in the middle of the oven and preheat to 325 degrees F. Set some water to boil.
In a large bowl, beat together the cream cheese, sugar, flour, and salt until smooth. If using a mixer, mix on low speed. Add the whole eggs and the egg yolks, one at a time, beating well (but still at low speed) after each addition. Beat in the vanilla and cream.
Grease a 10-inch cake pan (not a springform pan), and pour the batter into the cake pan. Place the pan in a larger roasting pan. Fill the roasting pan with the boiling water until it reaches halfway up the sides of the cake pan. Bake until the cheesecake is firm and slightly golden on top, 35 to 45 minutes.
Remove the cheesecake from the water bath and cool to room temperature. Cover the cheesecake with plastic wrap and refrigerate until very cold, at least 3 hours or up to overnight.
When the cheesecake is cold and very firm, scoop the cheesecake into 2-ounce balls and place on a parchment paper-lined baking sheet. Carefully insert a lollipop stick into each cheesecake ball. Freeze the cheesecake pops, uncovered, until very hard, at least 1 – 2 hours.
When the cheesecake pops are frozen and ready for dipping, prepare the chocolate. In the top of a double boiler, set over simmering water, or in a heatproof bowl set over a pot of simmering water, heat half the chocolate and half the shortening, stirring often, until chocolate is melted and chocolate and shortening are combined. Stir until completely smooth. Do not heat the chocolate too much or your chocolate will lose it’s shine after it has dried. Save the rest of the chocolate and shortening for later dipping, or use another type of chocolate for variety.
Alternately, you can microwave the same amount of chocolate coating pieces on high at 30 second intervals, stirring until smooth.
Quickly dip a frozen cheesecake pop in the melted chocolate, swirling quickly to coat it completely. Shake off any excess into the melted chocolate. If you like, you can now roll the pops quickly in optional decorations. You can also drizzle them with a contrasting color of melted chocolate (dark chocolate drizzled over milk chocolate or white chocolate over dark chocolate, etc.) Place the pop on a clean parchment paper-lined baking sheet to set. Repeat with remaining pops, melting more chocolate and shortening (or confectionary chocolate pieces) as needed.
Refrigerate the pops for up to 24 hours, until ready to serve.


Pingback: Food On Instagram Vs. Food In Reality | Pure Anarchy dot Net
Pingback: Food On Instagram Vs. Food In Reality | Sharing Interesting Stuff, Updates News & Free Tips
Pingback: Food On Instagram Vs. Food In Reality
Pingback: Food On Instagram Vs. Food In Reality : Grandmas Cooking
Pingback: Food On Instagram Vs. Food In Reality : Eat-Best.com
Can you please tell me how well the molds work on the cheesecake pops. I plan on making hem for my wedding in hte shape of hearts and stars.
Pingback: I Just Love Cheese Cake! A very “Sweet” Daring Bakers Challenge (and a 60-Day Project update) « Musings From The Fishbowl
Pingback: I’m just crackers for the Inaugural “Alternative” Daring Bakers Challenge! « Musings From The Fishbowl
Pingback: I used to love the opéra… Daring Baker’s May Challenge « Musings From The Fishbowl
totally fabulous!!!!!!
They turned out GREAT!
Oh my goodness those are the cutest!! I love your idea of molds. Sometimes getting messy with your baking is the funnest part. What an awesome challenge. I almost want to go back and do this one just for the fun of it 🙂
Thank you for leaving me such a nice comment on my blog! I am so impressed that you were able to make these vegan! I am not a vegan but I really love tofu. I think I’m going to have to give these a go. Lovely job!
They look great! I would have had a hard time not licking my hands if they were covered in chocolate. You have good will power.
wow – fabulous!