Ok, it doesn’t have to be for Valentine’s Day, but this cute little project does lend itself well to the upcoming holiday!
Because we can’t craft together in real life (unless you care to share the secrets of teleportation that is), my lovely friend Krys of Two Vegan Boys suggested we do a stitch-along. I loved the idea, and we thought you might want to join the fun!
True to the W.I.P. Wednesday philosophy, this is just a no-pressure way to “virtually” craft together in a fun, supportive and happy place. Have a question? You’re welcome to comment me a question and I’ll try to help. Never threaded a needle but feel inclined to give it a try? Fear not! Below you will hopefully find all the information you need to get started on a very basic embroidery project.
Krys found a cute (but not cutesy) free pattern from artist Andrea Zulli’s blog Badbird’s : Musings of a small angry bird. She also has the most beautiful prints in her Etsy Shop, Badbird. Wow!
Click on that little bear and you’ll find yourself chez Andrea where you can get your crafty hands on this free download – and many others! Andrea is a generous artist and has many free patterns.
Now that you have your pattern, what would you like to do with your finished project? You could make a Valentine’s Day card, stitch it on a t-shirt or other clothing, offer your framed embroidery as a gift to someone special… The size of your project will determine if you need to enlarge or shrink your pattern before beginning. I’m going to use this to make a little pillow as a gift, so the size of my “Love Bear” is based on that.
Needlework is a great craft when you’re on a budget because you don’t need much to get started!
You’ll need :

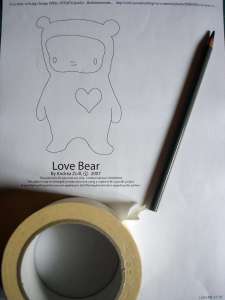
The printed “Love Bear”, some masking or painter’s tape and an embroidery pen. These pens have “disappearing ink”, which is pretty groovy for tracing patterns onto fabric (which you also need). I don’t want to be kicked out of the “Crafty Club”, but above is a light pencil, because I don’t have an embroidery pen and this has been working really well for me -just be careful to keep your lines thin!

You’ll also need some embroidery floss! This “thread” is usually composed of multiple strands -most often 6. You can use more or less of them, but for beginners, it’s usually easier to work with all 6. You’ll be using short lenghs of thread, so hold it between your thumb and pointer finger and you’ll want it a little shorter than your forearm (any longer and it’s apt to tangle up). Floss is most often cotton, but Vegans beware of wool floss which is also available.

Don’t forget an embroidery hoop to hold your work taut while your stitching – this will prevent puckering. If you stitch on a stiffer fabric, you won’t need one.

You’ll want an embroidery needle – its bigger eye (the better to see you with!) is easier to thread with embroidery floss. Here you see the difference between a sewing needle and the larger needlepoint counterpart.
To thread your needle, pass the floss through the eye, but don’t knot the two ends as you would with regular thread. Leave a shorter “tail” of thread on one side, the longer section on the other. Normally with embroidery you don’t knot the long end of your floss, but you’re a beginner and it’s totally ok!
Now you need to transfer your pattern to your fabric. Here’s how :

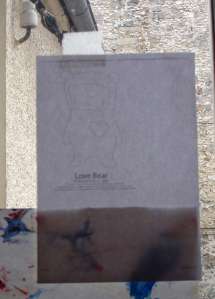
Tape your “Love Bear” to a window
![]()
Next secure your fabric over the pattern. You may want to tape the sides, too, because you’ll be tracing the pattern and you don’t want your fabric slishing about!

Once your pattern is traced on your fabric you’re ready to start stitching! How exciting is that! You’re about to embark on a fun project with blogger peeps, right on!
There are loads of different embroidery stitches, and a google search or a trip to YouTube will give you many stitchy options. I’m going to show you how to do a split-stitch, one of the most common and versitile there is. You can easily complete this and many other projects using only the split-stich, so here we go:

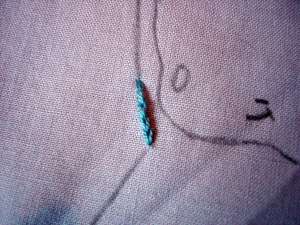
1) To begin, bring your needle up through the fabric from back to front.

2) Now bring the needle back down just in front of where you came up.

3) Now bring your needle up through the fabric in the middle of your first stitch. Try to bring it up in the centre of your floss. For example, if you’re using six-strand floss, ideally it would come up with three strands on each side. This is something you can play with depending on the look you want, but for today let’s stick to the basics.

4) Here you’re going to do what you did in step 2 – just bring the needle down in front of your stitch.

Here’s what 4 stitches look like. You’re creating a kind of “chain” if you will, each stitch connected to the next.
And there you have it! I hope this is helpful and will encourage you to give it a try! My big disclamer is that I’ve only been practicing embroidery for about 6 months and much of the jargon I’ve learned has been in French, so if you see errors or if something isn’t clear don’t hesitate to let me know and I’ll fix it up tout de suite! (That’s right away for you kids playing at home!).
Don’t forget to visit the other W.I.P. participants to see what they’re up to! If you’d like to join the W.I.P. list, to share your stitch-along progress or share your other projects, just let me know!
UPDATE : I’ll be posting a finished-project round-up on Valentine’s Day, so be sure and send me your links!

If you’re looking for some crafty ideas for Valentine’s Day gifts? Do you want to avoid buying more paper and plastic junk that will end up in the trash? Then visit Ellen at The Long Thread. She’s running a Recycled Valentine’s Day series with weekly links and ideas for great handmade gifts without adding more plastic and junk to our landfills.


Pingback: W.I.P. Wednesday : Featured Wipster Krys of Two Vegan Boys & Our March Stitch-Along « Musings From The Fishbowl
I stitched up a love bear! I am sending ito ff this weekend in a Valentine’s Day swap, but I have the pic on my flickr (privte until my partner recieves.) I would love it to be posted on the 14th! I made a little softie with the pattern :O)
Pingback: W.I.P. Wednesday : Stitch-Along Progress & more « Musings From The Fishbowl
That is so precious! Thanks for the tutorial!
Adorable ! Bon je n’ai pas le matériel pour le faire mais ça me donne terriblement envie de m’y mettre. Merci pour le tuto parfaitement clair!
Great tutorial, and so cute, too!